When you first start using WordPress, the Dashboard is the very first place you’ll see after logging in. If you’re not familiar with it yet, it might look a bit confusing at first. But don’t worry! In this guide, we’ll walk you through everything you need to know about the WordPress Dashboard in a simple, easy-to-understand way.
What Is the WordPress Dashboard?
The WordPress Dashboard is the admin area of your website — a private backend interface where you can control everything that happens on your site.
You can think of it like the control room for your website. From here, you can:
- Write blog posts
- Add new pages
- Install and activate themes and plugins
- Moderate comments
- Customize your website’s appearance
- Change settings
- And much more
Only people with the right login information (like admins, editors, or authors) can see the Dashboard. Your regular visitors will only see the front end of your site — the actual content and design.
How Do You Access the Dashboard?
To visit your WordPress Dashboard, just open a web browser and go to:
yourwebsite.com/wp-admin
This will take you to the login screen.
Enter your username and password, and after logging in, you’ll land on the Dashboard.
Getting Familiar with the Dashboard Layout
Once you’re inside, you’ll see a few key areas:
- Top Admin Bar:
This horizontal bar at the top gives you quick access to important actions like visiting your site, creating a new post, viewing comments, or accessing your profile. - Left Sidebar Menu:
This vertical menu is where all the main sections of your website are organized. You’ll use this to navigate around the admin area. - Main Dashboard Area:
This is the main part of the page, where different sections will load depending on what you click in the sidebar. - Screen Options and Help:
At the top right of your screen, you’ll see the Screen Options tab — clicking it lets you show or hide different sections. Next to that, the Help button gives basic guidance about the page you’re on.
Now, let’s go over the most important parts of the left sidebar menu.
Important Sections of the WordPress Dashboard
1. Home (Dashboard Overview)
This is your welcome screen, where you’ll find helpful widgets such as:
- Site At a Glance: Shows how many posts, pages, and comments your site has.
- Activity: Displays your recent posts and comments.
- Quick Draft: Allows you to quickly write a draft post without opening the editor.
- WordPress News: Shows updates and news from WordPress.org.
This page is mainly for quick access and an overview of your site.
2. Posts
This is where you manage your blog content.
You can:
- Add New: Create a new blog post.
- Edit Existing Posts: Update or delete old posts.
- Manage Categories and Tags: Organize your content by topics.
If your site has a blog, you’ll use this section often.
3. Media
The Media Library stores all your uploaded files like:
- Images
- Videos
- PDFs
- Audio files
You can add new media here or directly while writing posts and pages.
4. Pages
Pages are for content that doesn’t change often, like:
- About Us
- Contact
- Privacy Policy
You can create, edit, or delete pages from here. Pages don’t use categories or tags like posts do.
5. Comments
If your blog allows readers to leave comments, they’ll appear here.
You can:
- Approve or delete comments
- Mark them as spam
- Reply directly from the Dashboard
Moderating comments is important for keeping your site clean and respectful.
6. Appearance
This section controls how your website looks.
You can:
- Change or install new themes
- Customize the theme (colors, logo, menus, etc.)
- Add widgets to sidebars and footers
- Edit menus for navigation
If you want to redesign your site or adjust how it looks, you’ll spend time here.
7. Plugins
Plugins add new features to your website.
For example:
- Contact forms
- SEO tools
- Social sharing buttons
- E-commerce features
You can:
- Install new plugins
- Activate or deactivate them
- Delete ones you don’t need
Always make sure your plugins are updated to avoid security risks.
8. Users
This section is for managing the people who can access your site.
You can:
- Add new users (with roles like Admin, Editor, Author, or Subscriber)
- Edit profiles
- Change passwords
- Assign roles with different permissions
If you run a multi-author blog or a membership site, this is where you control access.
9. Tools
This area is used for special functions like:
- Importing content from other platforms (like Blogger)
- Exporting your site content
- Checking Site Health, which tells you if there are performance or security issues
You won’t use this section daily, but it’s helpful for maintenance.
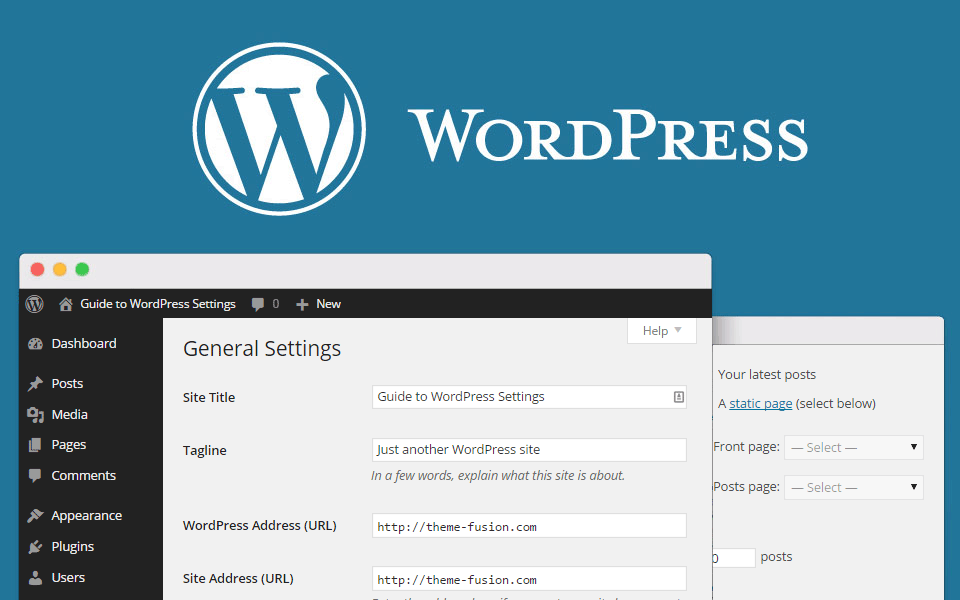
10. Settings
This is one of the most important sections.
Here you can configure:
- Site title and tagline
- Time zone and language
- Homepage and blog settings
- Permalinks (how your URLs look)
- Email notifications
- Comment rules
Make sure you go through these settings after installing WordPress for the first time.
Final Tips for Using the Dashboard
- Explore each section slowly — you don’t need to learn everything in one day.
- Update regularly — WordPress, themes, and plugins need updates for security and new features.
- Backup your site — in case something goes wrong, you won’t lose your content.
- Use the Help tab — each screen has a Help button to explain what you’re looking at.
Conclusion
The WordPress Dashboard is the heart of your website. Once you understand how it works, you’ll have full control over your site — without needing to write a single line of code. Spend a bit of time exploring each area, and in no time, you’ll feel confident managing your website like a pro.